The instruction center is designed to help you manage and setup your mortgage web site.
Within these instructions you will see yourdomain.com quite frequently.
We use that expression to note your web site address. For example: if your web address
is acmemortgage.com, if you see somewhere in the instructions that denotes
yourdomain.com,
it is really saying acmemortgage.com Important: if you haven't changed your admin temporary
password yet please do so asap. You can do this by going to https://secure-1003.com/yourdomain.com/admin
On the left you will find topics that you can get additional help on. We have tried to
make the instructions as user friendly as possible.
If you need additional help you can email us at
.
Change Temporary Admin Password
It is very important that you change your temporary password we provide you with.
How to change your temporary admin password:
Login to the admin control panel by going to https://yourdomain.com/admin
Enter your temporary user and password that was emailed to you
Click "Change admin account Password" link
Enter a new user name and
password that is easy for you to remember but
hard for someone to guess. Please include at least one number and a special character. Make sure you save this
information in a place that you can retrieve it
if needed.
Now you can login to the admin control panel at https://yourdomain.com/admin using your new user and password.
The admin control panel gives you access to:
Create and delete email addresses. (this option is available only if you want to use our server to manage your email accounts )
Change passwords of email accounts.
Manage the loan officers that appear in a drop down box on your secure 1003 application.
Manage the email notifications when a secure application is filled out.
Manage meta tags and titles of your website.
Due to responsive nature of our websites that contain complex HTML coding we do not have content editor available through Admin control panel. Any content or graphic changes please send to us via email. If you have any questions you can email us at
or call 630-552-0677.
If you haven't done so already we strongly urge you to change your temporary admin cp password. This can be done in your admin cp by clicking "Change admin account Password". if you are not sure how to do it, see our instructions my going to "Change temporary admin password" tab in the Navigation section of this page.
Create Email Accounts
Create an email account or a forwarding only email account. The difference between the two is that an email account is its own distinct email address. Forwarding email is not it's own account and only forwards mail to a designated email address. For example, you can create info@yourdomain.com to forward to your yahoo email address. We recommend you create your own accounts and not too many forward accounts because it is more professional to send emails from your domain address and not a Yahoo address(for example).
To create an email account:
Login to the admin control panel by going to https://yourdomain.com/admin.
Enter the admin user id and password you have created.
Click the "Manage email accounts and passwords" link.
Click "add" button under Email Maintenance to create a new email address
Check Type - Normal
Enter a password. We suggest a password that is at least 6 characters, at least 1 number and a special character.
Click create.
Once an email account has been created you will need to setup access to it.
To create an email forward account:
Login to the admin control panel by going to https://yourdomain.com/admin.
Enter the admin user id and password you created.
Click the "Manage email accounts" link.
Click "Add" to create a new email address
Check Type - Forward
Enter the new email name you want to setup as a forwarder
Enter the email address you want the new email forwarded to.
Click create.
Email accounts are set up with a 500 mb limit.
If you need additional help you can email us at
.
How to Access Newly Created Email Accounts
Email accounts can be accessed several ways:
You can access your email via a browser (Chrome etc.), using
webmail https://yourdomain.com/webmail.
You can access your email via Outlook, Outlook Express or other email
retrieval software.
The easiest way to retrieve your email is via webmail. This can be done
by going to https://yourdomain.com/webmail. You
will then be prompted for your email name and password that you
created. While using webmail is easy, it is far less powerful
and runs slower then using email retrieval software like Outlook. It becomes
even more cumbersome when you need to look at more then one email account.
For example: if you need to check 3 different email addresses, you will
need to log in to them separately.
Using email retrieval software like Outlook is the preferred method
for retrieving emails. Some of the main benefits include:
You will have one place to check all of your email addresses. You can
check 10 different email addresses at one place. Nothing is worse then
going to 3 different places to check 3 different email addresses. This
way you can check your main email address and a new less used email
address at one place.
It stores all email messages, sent or received on your hard
drive. With today's hard drive sizes you can store years of emails without
making a dent on your hard drive. So if you want to lookup an email you
sent 3 years ago, no problem.
There are many makers of email retrieval software. One of the most popular
is Outlook Express, because it is pre installed on most windows
based computers. We will give you the instruction link to setup Outlook
Express. However, you can use any email retrieval software you like.
The link below will take you to Microsoft Outlook email setup instructions. https://support.office.com/
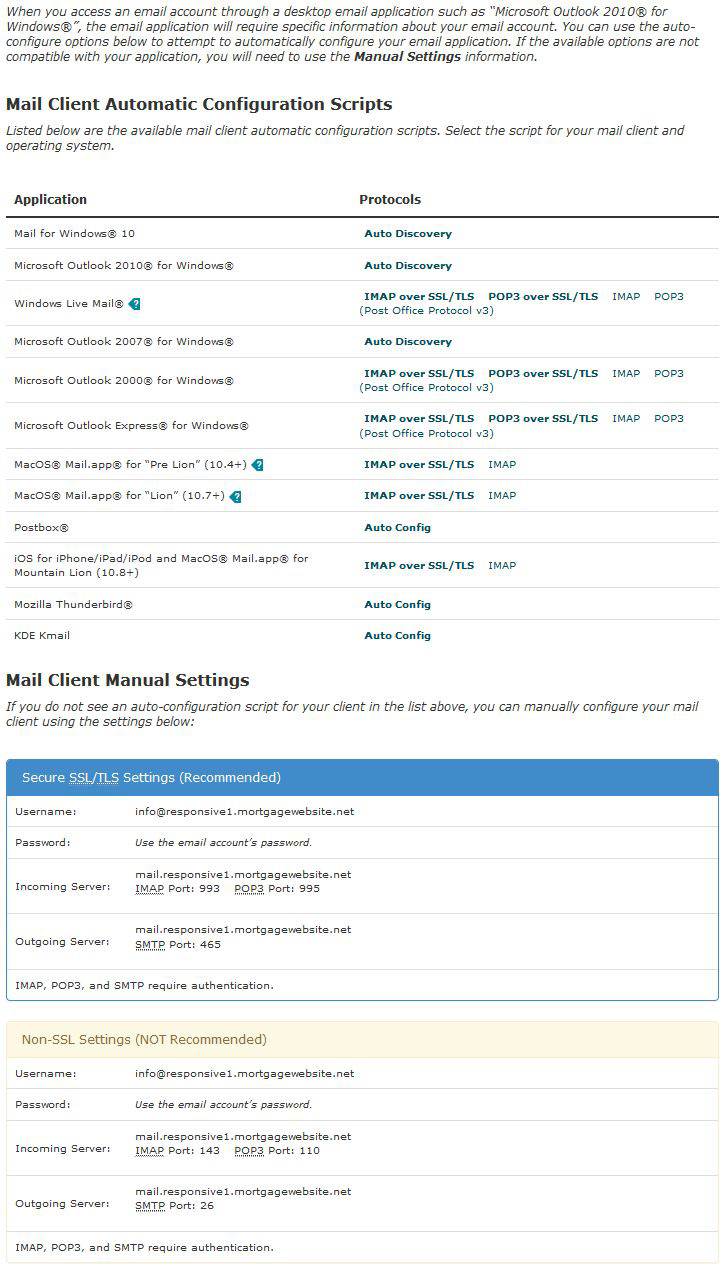
Information you will need to setup your email in Outlook software:
Server Type
POP3
Incoming mail server:
mail.yourdomain.com
Outgoing SMTP mail server:
mail.yourdomain.com
User Account
full email address that you created not just the first part of it.
Password
password that you created
Make sure that the outgoing server is authenticated.
See image below for manual settings (incoming and outgoing port numbers)
If you need additional help you can email us at
Manage Loan Officers Listed on Secure 1003 Application
When a customer visits your site and fills out an online application they can select a loan officer
from a drop down list that they are working with. Once the customer starts filling out the application
an email will be sent to the loan officer to notify them that someone has begun filling out an application.
Several things need to be done for the above scenario to work. By default there is no drop down box to
select additional loan officers. We setup the application to work only with the person who contacted
us to setup a web site. However, additional loan officers can be added to the application with the
admin control panel. Once there are 2 loan officers, the drop down appears on the first page of
the apply online and get pre-qualified. Also, when there is more than one loan officer a "none"
choice is available. If someone selects none the email notification will be sent to the primary account.
To add additional loan officers login to your admin control panel at https://yourdomain.com/admin. Then do the following:
Click the manage loan officers link
You should see one account that was initially setup for you, click the add button
In the Name Field put the name of the loan officer as you would like it displayed in the drop down
For login use the loan officers email address
For password create a password for the loan officer.
Important: Use a password of at least 7 digits and make sure to tell the loan officer in person what his login and
password are. Email is not a secure form of communication. Your clients are trusting you with there social
security numbers and other classified information.
Finally, select the email address where the loan officer should receive their notifications.
Remember that the primary account is where the email notification will be sent when someone selects none.
If you need additional help you can email us at
.
A notification will be sent both when an application is started and when it’s completed on your website. This ensures you are informed if a customer initiates the process but does not finish it, allowing your mortgage team to follow up accordingly. The notification email will include a link through which you can log in to view or download the application as a 3.4 MISMO file to your computer. It has been reported that saving files to the desktop may cause issues for some users, so we recommend saving it to “My Documents” or a folder of your choice. Alternatively, you can manually log in by navigating to https://yourdomain.com/secure-1003/loanofficerlogin.php.
Visitors to your site can select a loan officer (if multiple are available) with whom they wish to work, or they can opt not to choose any. The email notification will be directed to the loan officer selected by the applicant. If you require additional loan officers to be set up, please refer to the “Manage Loan Officers” section listed on the secure 1003 application page.
We’ve ensured the 1003 application process is secure. When sharing login credentials with new loan officers, please do so discreetly. Consider splitting sensitive information across different communication methods to maintain security.
To access the applications, go to https://yourdomain.com/secure-1003/loanofficerlogin.php and enter your login details (usually your email address) and password. You will then be directed to a control panel where you can view all applications assigned to you. Next to each applicant’s name, the date indicates the last time they logged into their account. From this panel, you can view applicant information, delete applications, or download them to your computer.
For instructions on how to upload the 3.4 MISMO file, please consult your third-party software or LOS documentation.
If you need additional help you can email us at
.
Make sure you hover over the video and click the quality (HD) to 720p in the bottom right corner and go full screen by clicking full screen in the bottom right corner.
Change the way your rates and closing costs are displayed.
The rates and closing costs can be configured to reflect your own rates and closing costs. To configure them, login to your admin panel and click Manage rates.
Manage rate source
Currently, you can use Wells Fargo, Provident Funding wholesale rates, manually enter your own rates, or use a combination. To do any of these click Manage rate sources. If you would like to use Wells Fargo rates then put a check in front of Wells Fargo (even if you don't use Wells Fargo as a lender you can use their rates. they can be tweaked). If you would like to enter your rates manually, put a check in front of Manual. If you would like to use a combination then check off both. For example, lets say that you have a lender who gives you a lower rate on an interest only loan. You could use the Wells option for every loan type except the interest only loan that you enter yourself. If you choose more than one rate source the rate engine will display the source with the lowest rate.
Manage Closing Costs
Within the manage the closing costs you will be able to enter your closing costs. You can enter an origination fee if you like. However, you will be able to put a profit margin(yield spread) on the back end as well if you like within the profit margin link. Within this screen you can decide what you want visible, amounts, how to group, and whether they are included in the APR. You can play around with it and go to your site and see how they are displayed. You can choose a flat fee or a percentage to determine the fee. You can add closing cost adjuster rules by clicking the Closing Cost Adjusters link. The rules allow for more advanced setup of closing costs. Using the Closing Cost Adjusters link will work better for setting up title insurance costs.
Manage Profit Margins
The rates brought in from Wells Fargo and Provident are wholesale rates so you may want to setup a profit margin(yield spread) to reflect your retail rates. Of course you could show wholesale rates and ass an origination fee as a closing cost. You could also add a back end profit margin and an origination fee. By default a 1% profit margin is used. You can setup either a percentage or flat rate fee. Also, you can use different profit margins for different loan types. If you are entering your rates manually, you can enter your wholesale rates and let the profit margins adjust them. If you don't want a particular loan program to show up, add a 99% profit margin for that loan program and it will not show up on the rates page.
Manage rate limits
When you run the rate engine you will notice that there are several rates given for each loan product. This section allows you to filter what rates are show based on the points. For example, You may see a rate that can be bought down by paying 4 points. This section allows you to create the cutoff points. You could enter a 2 for the upper limit and it won't show any discount point rates above 2 points. The same example applies for rebate points. You could make the lower limit 0 and it won't show rebate points.
Manage Home Page Rate Criteria
By default the rates banner that shows the rates every pages shows a very low rate. That is because by default the rates banner shows the rates with a 3 point buy down. If you like showing really low rates this will work for you. If you would like to show rates closer to par then this would be where you would do it.
Rate Adjusters
We will add the rate adjusters for Provident and Wells. However, if you want to make additional adjusters you can do that here. Essentially you can make unlimited rules. For example, you could add .5 points for loans between 0 - $100,000 if you want to make more on a low loan amount.
Closing Cost Adjusters
Here you can create unlimited closing cost adjuster rules. For example, for title insurance you could create a rule if a loan amount is between $100,000 - $150,000 the cost is $500 and so on.
Rate Side Panel
Once you run the rate engine the rates are displayed. To the right of the rates there is a side panel. Clicking the Rate Side Panel allows you to eliminate some of the selections available. It also allows you to change the states that show up in the drop box.
Manage Manual Rates
Whether you just enter your rates exclusively or use a combination of your own rates and Wells this is where you would enter your own rates. The rate engine will not show credit points past 1 point and will not show buy down points past 3 points. You can enter 0 for a rate and it will not show up on the rates page. So enter a 0 next to any rates you don't want shown. You can scroll down to the bottom and add custom rates.